Part B: Preparing the Topping and Chocolate 

While the centers are freezing, you can prepare the topping and set up your dipping station.
Step 5: Make the Crunchy Topping (Optional) 
If you are using the topping:
-
Crush your chosen biscuits/crackers finely.
-
In a small bowl, mix the crushed biscuits, melted butter, and sugar. This creates a slightly caramelized, golden crumb. Set aside.

Step 6: Melt the Chocolate 
The secret to a perfect snap is how you melt your chocolate.
-
The Best Way (Double Boiler/Bain-Marie): Place the chopped chocolate in a heatproof bowl set over a saucepan of simmering water (make sure the bottom of the bowl does not touch the water). Stir until completely smooth and melted. Remove from heat immediately.

-
The Quick Way (Microwave): Place the chocolate and optional oil in a microwave-safe bowl. Heat in 30-second intervals, stirring well after each one, until smooth. Be careful not to overheat, or the chocolate will seize!

Step 7: Set Up Your Dipping Station 
Have your melted chocolate ready, the baking sheet lined with parchment paper, and your crunchy topping nearby. Take the frozen peanut butter centers out of the freezer just before you begin dipping. 
Page 3: Step-by-Step Instructions (Dipping, Finishing, and Storage)
Part C: The Dipping and Finishing Touch 
This is where the magic happens! Working quickly is key, as the frozen centers will chill the chocolate fast.
Step 8: The Dipping Process 
Using a dipping fork or two regular forks, gently pick up a frozen caramel center.
-
Submerge the entire center into the melted chocolate. Ensure it is completely coated.
-
Lift it out and tap the fork gently against the side of the bowl to allow excess chocolate to drip off. A smooth, thin, even coating is what you are aiming for.

-
Transfer the dipped bite onto the prepared baking sheet.
Step 9: Adding the Crunch 
-
Immediately after placing the chocolate-dipped bite on the parchment paper (while the chocolate is still very wet!), sprinkle the top generously with your prepared crunchy biscuit topping. You can also gently press the top of the bite into a shallow bowl of the topping.
-
Repeat the process with the remaining peanut butter centers, working quickly.
-
Pro Tip for Dipping: If the chocolate starts to thicken as you dip, pop it back over the warm water (or into the microwave for 15 seconds) to re-melt it to a smooth, dippable consistency.

Step 10: The Final Chill and Set

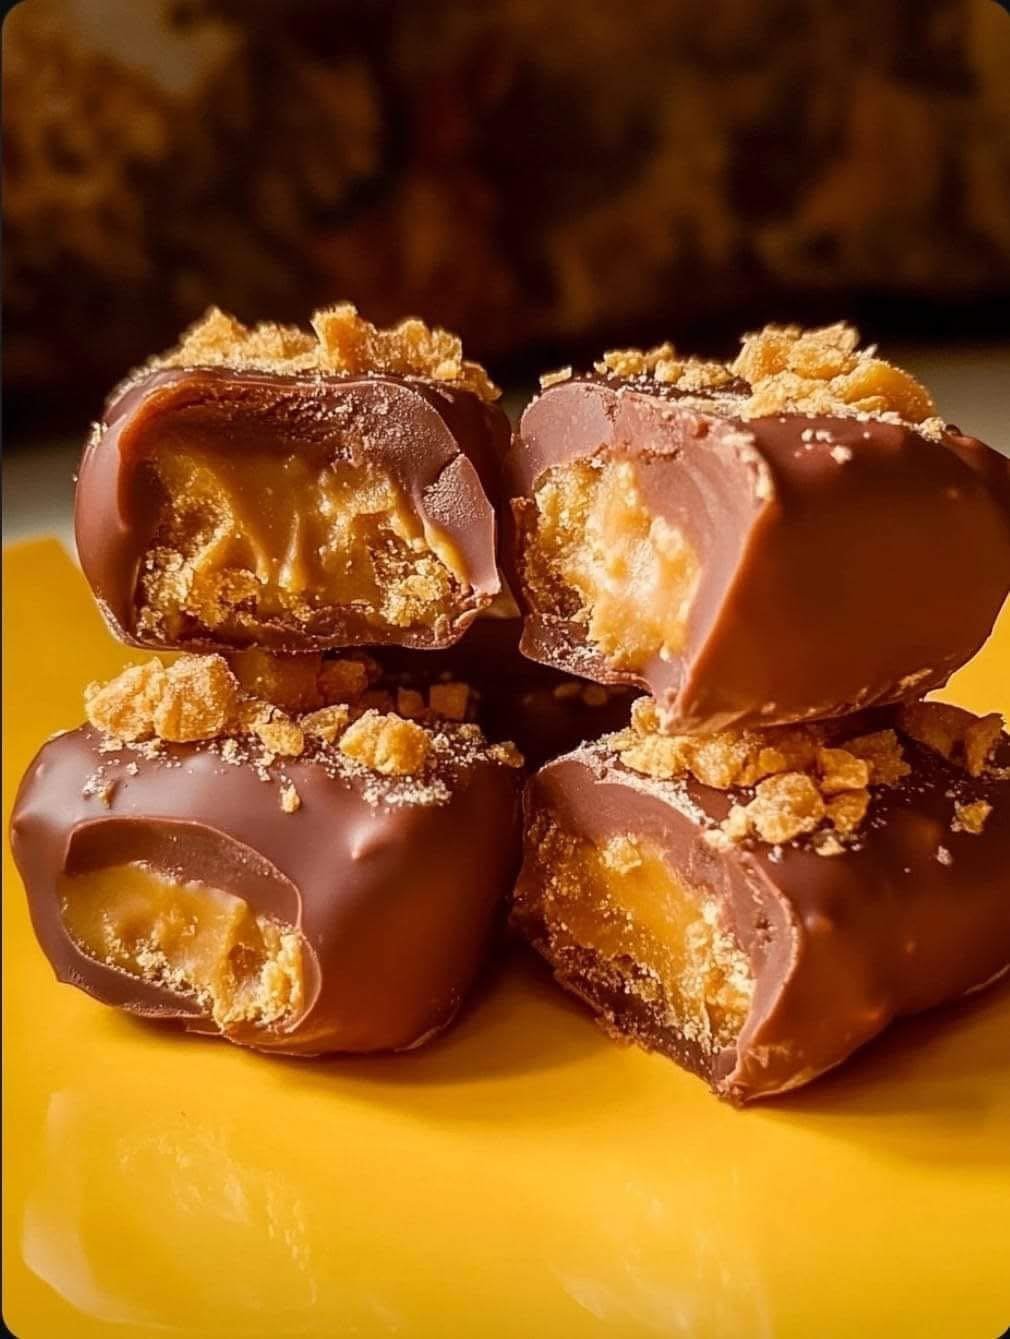
Once all the bites are dipped and topped, place the baking sheet back into the refrigerator (not the freezer this time) for at least 60-90 minutes. The chocolate needs to fully set and harden to achieve that signature “snap” when you bite into it. Once set, you can gently trim any excess chocolate “feet” around the base with a sharp, warm knife.

 Storage, Serving, and Variations
 How to Serve & Store (SEO Keywords: Chocolate Storage, Homemade Candy Shelf Life)
-
Serving: These bites are best served at slightly cooler than room temperature, which helps maintain the snap of the chocolate.
-
Storage: Store the bites in an airtight container in the refrigerator for up to 2 weeks. They are also freezer-friendly! You can freeze them for up to 3 months; just thaw them in the fridge for a few hours before serving. Perfect for making ahead!

 Creative Variations & Substitutions
Want to mix things up? Try these ideas!
-
Dark Chocolate Dream: Use high-quality Dark Chocolate (70% Cacao) instead of milk chocolate for a more sophisticated, less sweet profile.

-
Nut-Free Option: Substitute the peanut butter with Sunflower Seed Butter (SunButter) or a nut-free cookie butter. Adjust powdered sugar as needed to achieve the right dough consistency.

-
Salted Caramel Upgrade: Instead of the crunchy topping, sprinkle a few flakes of Maldon Sea Salt on top of the wet chocolate for an extra burst of salty goodness.

-
Pretzel Crunch: Fold finely crushed pretzels into the peanut butter caramel center for an incredible salty-sweet crunch inside the bite!

 Enjoy Your Masterpiece!
You’ve successfully created a batch of spectacular Homemade Millionaire’s Caramel Peanut Butter Bites! They are rich, dreamy, crunchy, and utterly irresistible. Take a moment to admire your work, then treat yourself to the best bite you’ll have all week! Enjoy!

-