This 2-ingredient dessert is creamy, silky, and ready in minutes. No eggs, no baking, no complicated steps. Make a simple milk pudding with cornstarch – then customize with your favorite flavors.
Let’s be honest: sometimes you just want something sweet. You don’t want to preheat the oven, measure a dozen ingredients, or spend an hour cleaning up. You want dessert – creamy, satisfying, delicious – and you want it now.
That’s exactly what this 2-ingredient dessert delivers.
With nothing more than milk and cornstarch (and a little sugar or vanilla if you like), you can create a silky, pudding‑like treat that’s surprisingly elegant. It’s the kind of dessert that feels like a cozy hug in a bowl – smooth, light, and gently sweet. And because it sets in the refrigerator, it’s perfect for making ahead.
This recipe is a blank canvas. You can keep it plain for a simple milk pudding, or dress it up with chocolate, fruit, coconut, or nuts. It’s budget‑friendly, beginner‑proof, and so easy that you’ll memorize it after one try.
In this guide, I’ll walk you through the basic method, explain the science behind why milk and cornstarch thicken, share pro tips for a lump‑free texture, and offer endless variations to keep things exciting. Plus, you’ll get storage advice, nutrition facts, and answers to all your questions.
Let’s make dessert – the easy way.
Why You’ll Love This 2-Ingredient Dessert
 Only 2 base ingredients No baking required
Ready in minutes Perfect for beginners
Creamy and satisfying Endlessly customizable
Budget‑friendly Make‑ahead friendly
This isn’t just a recipe – it’s a technique. Once you learn how to thicken milk with cornstarch, you can create puddings, custards, and even dairy‑free desserts in endless flavors. It’s a kitchen skill that will serve you for life.
The 2 Base Ingredients – Why They Work
 Milk (2 cups)
Role: The creamy, liquid base. Whole milk yields the richest, silkiest texture. 2% milk works well but produces a slightly thinner pudding. Skim milk is not recommended – it lacks the fat needed for a luxurious mouthfeel.
Dairy‑free options: Almond milk, oat milk, or coconut milk all work. Coconut milk (full‑fat) creates an especially rich, tropical dessert. Plant‑based milks may require a little extra cornstarch (see troubleshooting).
 Cornstarch (2 tablespoons or 1 packet)
Role: The thickener. Cornstarch is a pure starch extracted from corn kernels. When heated with liquid, the starch granules absorb water, swell, and burst, creating a gel that thickens the mixture. This is the same principle behind gravy, pudding, and pie fillings.
Why not flour? Flour can be used but requires longer cooking to remove the raw taste and results in a cloudier, less silky texture. Cornstarch is faster, clearer, and smoother.
Substitution: Arrowroot powder or potato starch work similarly. Use the same amount.
Optional Flavor Additions (Highly Recommended)
While the base recipe works with just milk and cornstarch, the result is quite plain. These simple additions transform it into a real dessert:
Ingredient Amount Effect
Granulated sugar 3–4 tablespoons Sweetness (essential)
Vanilla extract 1 teaspoon Warm, sweet depth
Cocoa powder 2 tablespoons Chocolate pudding
Honey or maple syrup 3 tablespoons Natural sweetness
Cinnamon ½ teaspoon Warm spice
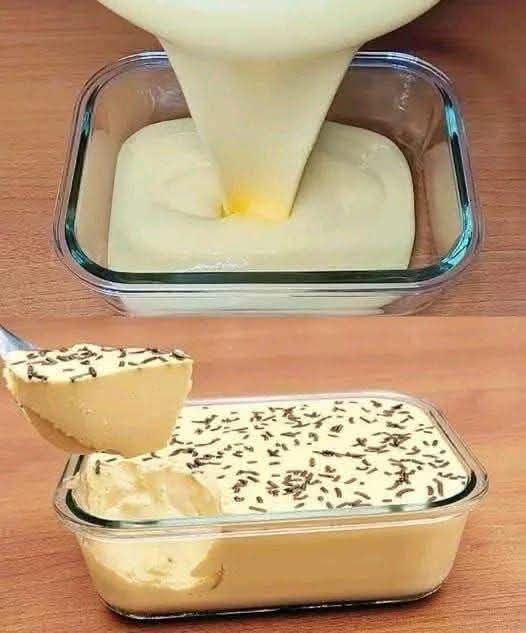
In the image: The dessert is topped with chocolate sprinkles – a classic finishing touch that adds crunch and visual appeal.
The Recipe – 2-Ingredient Milk Pudding (Basic Version)
Prep time: 2 minutes
Cook time: 5–8 minutes
Chill time: 1–2 hours
Total time: ~1.5 hours (mostly inactive)
Yield: 2–4 servings
Ingredients
Ingredient Amount Notes
Milk (whole or 2%) 2 cups Room temperature
Cornstarch 2 tablespoons Leveled
Sugar (optional but recommended) 3–4 tablespoons To taste
Vanilla extract (optional) 1 teaspoon
Equipment
· Medium saucepan
· Whisk
· Measuring cups and spoons
· Serving bowls or ramekins
· Plastic wrap (to prevent skin)
Step‑by‑Step Instructions
Step 1: Mix the Cornstarch with a Little Cold Milk
In a small bowl, whisk together 2 tablespoons of cornstarch with ¼ cup of the cold milk until completely smooth. This “slurry” prevents lumps when you add it to the hot milk. Set aside.
Step 2: Heat the Remaining Milk
Pour the remaining 1¾ cups of milk into a medium saucepan. Add the sugar (if using). Heat over medium heat, stirring occasionally, until the milk is hot and steaming but not boiling – about 3–4 minutes.
Do not boil yet. If you add the cornstarch to boiling milk, it can form lumps.
Step 3: Add the Cornstarch Slurry
Give the cornstarch slurry a final stir (it settles quickly). Pour it into the hot milk while whisking constantly.
Step 4: Cook Until Thickened
Continue whisking over medium heat. The mixture will start to thicken noticeably within 2–3 minutes. Once it reaches a pudding‑like consistency – thick enough to coat the back of a spoon – remove it from the heat.
Pro tip: For a thicker, more sliceable dessert, cook for 1 extra minute. For a softer, creamier pudding, stop as soon as it thickens.
Step 5: Add Vanilla (Optional)
Remove the saucepan from the heat. Stir in the vanilla extract (if using).
Step 6: Pour into Serving Dishes
Divide the pudding evenly into serving bowls or ramekins. To prevent a skin from forming, press a piece of plastic wrap directly onto the surface of the pudding.
Step 7: Chill
Refrigerate for at least 1–2 hours, until fully set and cold. The pudding will continue to thicken as it cools.
Step 8: Serve
Remove the plastic wrap. Top with chocolate sprinkles, fresh fruit, nuts, or a dusting of cinnamon. Serve cold.
Pro Tips for the Perfect 2-Ingredient Dessert
- Always Make a Slurry
Adding dry cornstarch directly to hot milk guarantees lumps. Mixing it with cold liquid first is non‑negotiable.
- Whisk Constantly (But Gently)
Constant whisking prevents scorching on the bottom of the pan and ensures a smooth texture. A silicone whisk is gentler on non‑stick pans.
- Don’t Overcook
Overcooking breaks down the starch, causing the pudding to become thin and watery again. As soon as it thickens to a pudding consistency, remove it from the heat.
- Prevent the Skin
If you don’t like the rubbery film that forms on pudding, press plastic wrap directly onto the surface before chilling. This also prevents condensation from dripping back onto the pudding.
- Strain for Ultra‑Smooth Texture
If you notice any small lumps, pour the hot pudding through a fine‑mesh strainer before chilling. This guarantees a silky finish.
- Adjust Sweetness to Taste
Start with 3 tablespoons of sugar. Taste the mixture (carefully – it’s hot) and add more if needed. Remember that chilling dulls sweetness slightly.
Stay creamy, stay sweet, and keep cooking simple.