Introduction
Lemon curd canning is one of those delightful kitchen creations that brings sunshine into every jar. It is smooth, creamy, and bursting with bright lemon flavor that reminds you of warm summer days. This recipe captures the zesty taste of fresh lemons and turns it into something you can enjoy anytime of the year. When you spread it over warm toast, fill it in cupcakes, or layer it between cakes, it brings an instant smile. Lemon curd is a classic treat that feels both fancy and comforting at the same time.
People love lemon curd because it tastes both sweet and tangy, making it perfect for many desserts and breakfast recipes. Unlike regular jams or jellies, lemon curd has a creamy texture that feels rich and luxurious. It is smooth like custard and carries the freshness of citrus fruit. Homemade lemon curd made for canning is not only more flavorful than store-bought versions, but it also gives you complete control over the ingredients. You can adjust the sweetness, the texture, and even the strength of the lemon flavor according to your liking. It is also a wonderful gift idea that friends and family will truly appreciate.
Making lemon curd for canning is a wonderful project when you have fresh lemons at home and want to make something useful and long lasting. It can also be a relaxing weekend activity where you fill your kitchen with the aroma of fresh citrus. Many people make it during winter when lemons are in season and their flavor is at its best. You can also prepare it for special occasions such as holidays, parties, or afternoon tea gatherings. Having homemade lemon curd ready in jars means you can add a bright and happy touch to your dishes any time you want.
Ingredients You Will Need
To make this smooth and creamy lemon curd for canning, you will need the following ingredients:
-
Fresh lemons – 5 large (for zest and juice)
-
Granulated sugar – 1 and 1⁄2 cups
-
Unsalted butter – 1 cup (softened and cut into small pieces)
-
Large eggs – 4
-
Egg yolks – 2
-
Salt – 1⁄4 teaspoon
For canning, you will also need:
-
Sterilized glass jars with lids (half-pint or small size recommended)
-
A large pot for the water bath
-
A jar lifter or tongs
-
Clean cloths and a funnel
Step by Step Method
Step 1: Prepare the lemons
Wash the lemons very well because you will be using both the zest and the juice. Using a fine grater or a zester, remove only the yellow part of the peel. Avoid the white pith underneath because it can be bitter. Once you have the zest, cut the lemons in half and squeeze out the juice. You should have about one cup of fresh lemon juice. Strain the juice to remove any seeds or pulp.
Step 2: Set up a double boiler
To prevent the eggs from cooking too quickly, it is best to use a double boiler method. Fill a saucepan with about two inches of water and bring it to a gentle simmer. Place a heatproof bowl over the saucepan, making sure the bottom of the bowl does not touch the water. This will help the curd cook slowly and evenly.
Step 3: Combine the main ingredients
In the heatproof bowl, whisk together the eggs, egg yolks, sugar, lemon juice, and lemon zest. Stir until everything is well combined and the mixture looks smooth. This step helps the sugar dissolve and mixes the eggs evenly into the liquid.
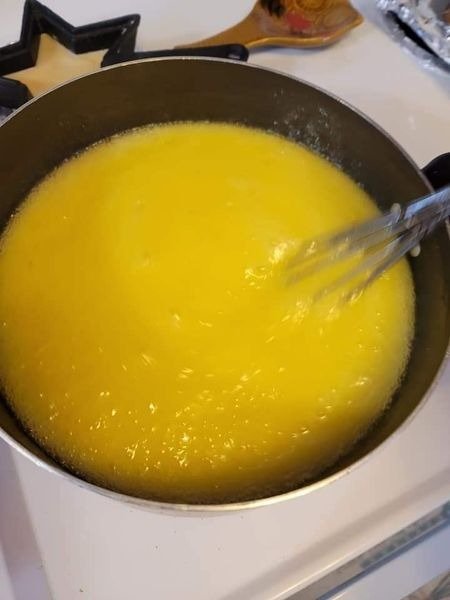
Step 4: Cook the lemon curd
Place the bowl over the simmering water and start whisking slowly. Continue whisking for about 10 to 15 minutes until the mixture thickens. You will know it is ready when the curd coats the back of a spoon and leaves a clear line when you run your finger through it. Keep the heat gentle because high heat can cause the eggs to scramble.
Step 5: Add the butter
Once the curd thickens, remove the bowl from the heat. Add the softened butter pieces one at a time, stirring until each piece melts completely. The butter adds a silky smooth texture and a rich flavor to your lemon curd.
Step 6: Strain the curd
For a perfectly smooth lemon curd, pour it through a fine sieve into another clean bowl. This step removes any bits of cooked egg or zest, leaving you with a creamy and velvety curd.
Step 7: Fill the jars
While the curd is still warm, use a clean funnel to pour it into your sterilized jars. Leave about half an inch of space at the top. Wipe the rims of the jars with a clean damp cloth to make sure there is no residue. Seal the jars tightly with the lids.
Step 8: Process the jars
Bring a large pot of water to a gentle boil and carefully lower the sealed jars into the water using tongs or a jar lifter. Make sure the jars are fully covered with water. Let them process for about 15 minutes. This step ensures that your lemon curd is safe for storage and will last longer.
Step 9: Cool and store
Remove the jars from the hot water and place them on a towel or cooling rack. Let them cool completely without touching them. Once cooled, check the lids to ensure they are properly sealed. You can store sealed jars in a cool, dark place for up to three months. After opening, keep the lemon curd refrigerated and use it within two weeks.
Why This Recipe Is Special
LOOK NEXT PAGE